Welcome to the beginning of Part Two of my ongoing irregular series of tutorials for DAZ Studio. You can find all of the previous (and future!) tutes marked with the tutorial tag. Hopefully I’ve covered all of the basics you need to know to get started with this free, wonderful 3D rendering program so with Part Two we’ll be looking at a few more (slightly!) advanced techniques. Enjoy!
Let’s talk Depth of Field. For those who aren’t familiar with the Wonderful World of Photographic Terms, this is the “trick” where stuff that’s in focus is sharp, but everything else is blurred to some degree. It’s something our own eyes do automatically. Just hold a finger in front of you and focus on it for proof. The rest of the room blurs out. Then look at the furthest wall, and you’re finger goes blurry. Ain’t the human body clever? Every time you watch TV or a movie, you’re seeing DoF in action; cameramen and directors are very skilled at using depth-cues to show we viewers where the action is.
Anyhow. Our brains interpret images with some degree of Depth of Field in them as being “more realistic” than those without. It’s one of the reasons why 90% of all 3D renders look… well, like 3D renders. Our eyes look, see there’s no depth blur, and shout “that’s fake!” at our cortex. Also without Depth of Field our eyes have to hunt for the central subject of the image. They need a focal point, literally.
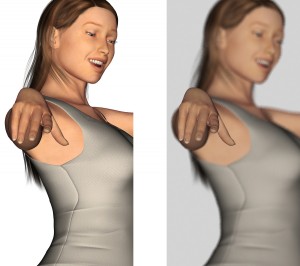
Here’s a quick (and somewhat extreme) example. The image on the left has no Depth of Field. The one on the right does. All of the other settings are identical. See?
Getting a Depth of Field in DAZ Studio is frustrating by default. Select the current camera in the Scenes tab, and over in Parameters you can enable Depth of Field and set a focal distance. This pretty much means playing “guess the number” and re-rendering until you hit the right distance. No thanks. Some folks use a trick of adding a “null object” into the scene and setting the camera to point at that, but there’s now a much, much easier way to achieve accurate Depth of Field.
And it’s a free plugin. Booyah.
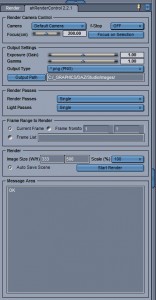
Hop over to this thread over at DAZ3d, download ahRenderControl and unzip it into your Program Files/DAZ/Studio diectory. Restart DAZ Studio and you’ll find another entry in the View->Tabs menu called ahRenderControl. Enable it and drag it to the side of the screen to lock it in place. You should see something like this (click to view large):
This plugin is nothing short of brilliant. Alongside making Depth of Field real easy, it also provides multi-pass rendering, auto-saving renders and more. It effectively filled my DAZ Studio wishlist in one fell swoop, which is nice. For now though, we’re just going to look at it’s Depth of Field capabilities.
To use it, just select the exact object you want to be in focus, hit the Focus on Selection button and choose the f-Stop. For the purposes of this, all you need to know is that the lower the f-Stop, the bigger the blur. So, f/4 will blur out pretty much everything but the selected item, whereas f/22 will only blur out the most distant object (None of this is quite accurate, but it’s near enough to the truth to be good enough).
For the image above, I selected Vicky’s right index finger and set the f-Stop to f/4. Hit render. Done. See – I told you it was easy :D
So. When should you use Depth of Field? Perhaps a better question is when shouldn’t you use it; after all – it’s such a simple, essential technique that it should be in the list of things you do when putting together an image: 1. Set the scene, 2. Lighting, 3. Set the focal point and Depth of Field, 4. Render.
The only times I don’t use Depth of Field are when I’m just kicking out a quick 10 minute render for a blogpost, or explicitly don’t want a realistic look to the final image. Even for anime or graphic novel style renders though, a touch of DoF can make all the difference.
The last point is knowing where to set the focal point. There’s one general guideline I work with for my own renders: if in doubt, focus on the left eye. This means drilling down through the figure’s body in the Scenes tab, selecting the Left Eye, then hitting the Focus on Selection button the the ahRenderControl tab. Remember to set the f-Stop – f/5.6 to f/11 should do it, and you’re all set. Of course, if there’s something in the scene that naturally needs to stand out (such as a weapon or moving vehicle), select that instead. Experiment. Play. Have fun.
After all, that’s what it’s all about, right? :D
Till next time!





Love the tutorials! Unfortunately, the depth of field plugin you link to does not work in DS3 which seriously sucks because I would love to use that baby! LOL Just thought I’d let you know. :-)
Thanks for the kind words :D
You’re quite right – Pendragon hasn’t released his RenderControl for DS3 yet though he has assured folks that it will be coming soon. There’s a small number of “essential” (well, essential to me, anyway) plugins that haven’t yet made the transition to DAZ Studio 3, and this is one of them.
In the meantime there’s nothing to stop you from using using DAZ Studio 2.3, of course. That’s what I’m using, mainly because my little work-a-day laptop can’t run DS3 at all. Consider yourself lucky :D
I have a problem here.. Is it possible to still download that ahrendercontrol? I tried downloading it but I can only get the mac version. The windows version just contains an empty folder.. I feel sad :( I want this so badly.. Can you check it for me and if it really is gone is there any possibility that you can send it to me?