One of the most useful items in any photographer’s arsenal is a white cloth background. This throws reflected light back onto the subject and gives a surface that’s perfect for catching shadows. With that whitecloth and different lighting setups, you’ve total control over the style, tone and feel of the entire scene.
Over in the world of DAZ Studio, it’s exactly the same. If only you had one in your Content folder……… and you have! This time around I’m going to show you how to use the Surfaces tab to give you thousands of different looks, style and colours for all of your figures, clothes and props – starting with the simplest object of all; the backdrop.
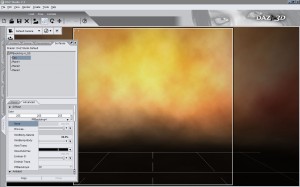
Fire up DAZ Studio and load up the orange swirly backcloth from Figures->Environment then go to the Surfaces tab. Select “Cyc” in the top box then click on the dropdown that says “PBackdrop4” and replace it with “None”. One instant white backcloth! Of course, it doesn’t have to be white – click on the colours line (currently saying 255 255 255) and change it to any colour you want. Both black and white backcloths have their uses – white reflects the light while a black one absorbs it, meaning you can set the mood from light and airy to dark and sinister with just a change of background colour.
Incidentally, this backcloth is called a Cyclorama pane in Poser/DAZ Studio parlance, and there’s tons of cool (and not so cool) photographic images that can be applied to it to be found at ShareCG. Just search for the term “Cyclorama” then download, unzip and apply using the dropdown below the colour selector bar in the Surfaces tab. Browse to the file, and apply.
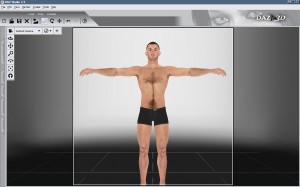
The Surfaces tab is the place where you can change the colour, texture, opacity, etc of any surface of an object. This means you can recolour anything, meaning just one item of clothing can have 1,000 uses. We’ll get to that in a mo’ – right now, go to Figures->DAZ People and load in Michael 4 (finally!). If you haven’t got him, the Base model is available for free from DAZ3d. Yeh, I’m a DAZ whore. What can I say?
Unlike your free Victoria 4 model (or Aiko 3, for that matter), Mickey comes with absolutely no morphs built-in on the free model. Thankfully it’s just a terrific base figure with a very good starting texture, so I’ll forgive them anything. The other problem is that unless you’re willing to pay cold hard cash or hunt for freebie Michael 4 clothing (I’ll be posting links another time), he’s gonna be wearing those grey boxers an awful lot.
Here’s where the Surfaces tab comes in. We can turn the Base Michael 4 into quite a passable Superhero just by changing the colours and textures on his body. It’s not as flexible solution as getting a decent full Bodysuit for him, but that’s $20 (and well worth it), but this is free, and a good demonstration of the Surfaces tab too.
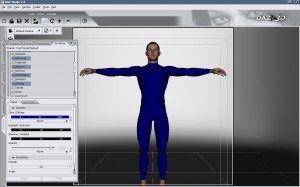
In the Scenes tab, make sure that Michael 4 is selected, then head to the Surfaces tab. Michael’s body parts are listed in the top box. Select 2_SkinHip, then hold down the CTRL key and select 2_Nipple, 2_SkinTorso, 3_SkinArm, 3_SkinForearm and 3_SkinLeg too.
Set the texture dropdown (currently saying <multiple>) to None, then pic a colour from the colour selection box. Here’s Mickey sporting a rather fetching blue number.
That’s all fine and dandy, but he’s looking a bit… well…. flat. Let’s shine him up a little. While all of the bodyparts we’re recolouring are still selected, head over to the Advanced tab to the section marked Specular and set the Glossiness to 100%, Colour to pure White (255 255 255) and Strength to 100%.
Select individual boxparts (hip, arms, forearms, hands, etc) and you can remove the current skin texture and recolour them, mixing and matching to your heart’s content. Recolour the hands, forearms, nails and feet and you’ve got instant boots and gloves. Here’s a quick example using the white backcloth and WildLights, Default camera set to 80mm focal length, Y Translate 170, Z Translate 200, X Rotate -10:
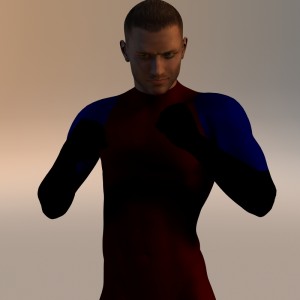
Free Michael 4, free lights, free backdrop and nuthin’ else!
Damn. I’m showing you all my secrets now!
This is all good, but it isn’t a perfect solution. The material zones in Michael 4’s body aren’t set up in a clothing-friendly fashion so you couldn’t easily fake a T-Shirt or Superhero Speedos, for example, and the “cothing” is a little too skin-tight as you’re painting directly onto his….. uhhh… skin.
That’s where the real bodysuits come in; they’re set up to be completely clothing-style friendly and (as separate objects) are raised from the skin to start with. Some figures (most notably Aiko 3 and Hiro 3) have built-in “Spandex” morphs which provides faux cuffs, glovelines, etc. Hiro 3 is a great figure for creating Superheroes! Mix and match between colourizing the skin and a real bodysuit and you’ve limitless possibilities. Use the Opacity slider (found on the Advanced tab in surfaces) to alter the transparency or completely hide parts of the bodysuit, and you’re away.
The Surfaces tab is useful for far more than just lazily creating Spandex Superheroes though. Anything can be recoloured meaning those free clothes you’ve got for Vicky 4 in your runtime are now available in limitless shades! Just select the item, head into the Surfaces tab and colour away.
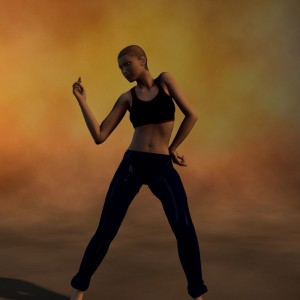
Vicky sporting recoloured Casual Pants and Sporty Top. Simple, eh?
Next time: Daz’s best kept secret – Shaders!



This is great info and something that I’ve been toying around with on my own [you always make it look so easy]. I’ve purchased the bodysuit and would be interested in any thoughts on customizing that as well….
Thanks
@BS Cool! Answer me a few questions and I’ll be happy to point you in the right direction.
Was it the Michael 4 Bodysuit you got? Any particular genre in mind? Have you got the M4 Morphs++ as well? How about the (excellent) Bodysuit Texture Pack?
None of these are essential (as I hope I’m showing :D), but the Morphs++ are too useful to ignore. The best way to get those is a part of the M4 Complete Bundle. That’s just $20 more than getting the Morphs on their own, and you get a decent set of (recolourable) clothes, hair and better skin textures. All of which you’ll use over and over.
Sign up for the DAZ Newsletter too – each week they release a freebie, and they’re always of very high quality. This week’s is the Catoblepas :D
If you’re a new registration at DAZ, you should find a special Coupon in your account marked STUDIOSTART. This gives you a stonking 97% off one of DAZ’s Bundles listed here. It’s a great way to get up to $100 of new content for just $3. Follow the instructions on this forumpost which explains how to use the Coupon.
Depending on what you want to create, the SciFi set, FREAK, Dinosaur or Safari set are all excellent choices. The Fantasy Creature set isn’t great, unfortunately, unless there’s something in there you really, really want.
Phew. Hope that helps!
When it comes to the Bodysuit, the key is to learn the different Material Zones it’s got. There’s a lot of them with several covering just the arms, legs, etc. Use the Opacity slider to hide the ones you don’t want visible, and recolour the ones you do. It takes a little practise but you’ll soon find a pattern to them that you like. Add in recoloured skin (like in the tutorial above) and you’ll be able to re-create pretty much any imaginable superhero outfit. Oh, and you can always add two bodysuits to the same figure for even more variety…….
Here is my pic for this assignment: http://twitpic.com/ukx4 and I’ll take your advice to heart. I have purchased just the body suit for M4 [comes in a two part download]. I can’t seem to get it to toggle between “seams showing” and then having them not show but with what you’ve taught me here today…:)
Excellent! :D
I like the use of some of the stuff from the Midnight Avenger set too. As that’s designed for Michael 3 rather than Michael 4 the body proportions are very different, but it is possible to get things to fit pretty well by tweaking the X, Y and Z Scale for each part. I’ll be covering that bit of magic another time.
I get the XYZ Translate, and the XYZ Rotate [to a point] but shouldn’t I just be able to move a particular selected item up, down, or side to side where it “sits”?
Yep. That’s what the Translate dials do. Select the object in the Scenes tab, then use those dials to move it up & down (Y), side to side (X) or forwards and backwards (Z) as you need.
Is that what you mean?
Alternatively, you could move the camera. In that case, select the Default Camera from the Scenes tab and use the Translate dials on that instead.
Yes, that is what I meant. I’ll give it a shot. / Moving the camera though, that move everything in the scene though right?
Kinda. The trick is not to think about it too hard. :D
Sometimes though, moving the camera is a lot easier than moving the figure, especially if you’re trying to get the figures placed just right – in the case of a fight scene, for example.
I’ve done something weird because when I move the translators around the only things that move are little “rainbow strips” in the middle of image but not the thing that is sellected [which is the breastplate] – thanks for all the help GW
Ah. Sounds to me like you’re trying to move something that’s conformed to a figure (ie, you’ve used “Fit To”…..). If that’s the case, you can’t (easily) move it – because it’s conformed.
There is a way though, which involved removing the entry in the “Fit To” drop down, manually positioning it into place then Click-and-dragging the entry in the Scenes tab down so it’s parented to the bodypart it’s covering. So in this case, position the breastplate then click-and-drag it’s like in the Scenes tab over Michael’s Chest entry (probably need to drill down to see this). Then, it’ll move when you pose the figure, but it’ll be positioned correctly too.
I’ll be covering this in more detail another time though :D
Aaahhhhh, the strong is force with you sir. Thanks.
I mean, the force is strong…oh you know what I mean….
@BS Lol!
Here are two more. In the grand tradition of Nightwing & Starfire, Backlash and Taboo, and Spiderman and the Black Cat:
http://twitpic.com/unli
&
http://twitpic.com/unm2
Yep. You’ve definitely got it!
I recommend you take a close look at http://www.animotions.com/ (free registration required). The Gallery should provide tons of inspiration, and the Free section lots of…. well…. I’ll leave you to work that out for yourself :D
Thanks